Thursday, July 31, 2008

OVEN FRIED POTATOES

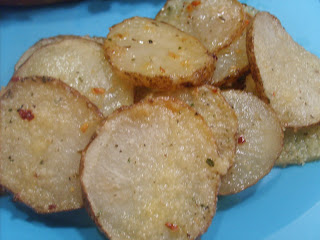
Do you own any Pampered Chef stones? I have several, and let me tell you, they make the best oven fried foods! Even these simple oven fried potatoes, that we made tonight, turned out so delicious. I guess you could call them "roasted" potatoes too. I'll roast just about any veggie I can get my hands on. We LOVE them prepared that way more than any other. I fixed my Steak and Onion Hoagies tonight for dinner and these potatoes went really well with them.

OVEN FRIED POTATOES

4 small potatoes, sliced relatively thin
olive oil or butter (your choice)
1 clove garlic, minced
Sea Salt or Kosher salt
McCormick Grinders - Italian herb seasoning
Parmesan cheese

Slice potatoes and lay them on your Pampered chef stone. Drizzle either lightly with olive oil or if you prefer butter, dot here and there with butter pats. Sprinkle with minced garlic, Sea salt, McCormick's grinder Italian herb seasoning and Parmesan cheese. Bake at 400 for about 15 minutes, or until fork tender and lightly browned.

*NOTE* Do you own and use any Pampered Chef stones? If so, which ones do you own, and what do you use them for the most?

I have the cookie sheet, the 9 x 13 baking pan, the pizza stone, the deep dish pie baker and a large round bowl.
I use the cookie sheet the most for baking and roasting food items. The baking pan I use for cakes and roasting chicken or other cuts of meat. The pizza pan gets used for any type of bread item, roll or cookies.

HOMEMADE MAC-N-CHEESE

I apologize for the pic. We had midweek service last night and I didn't have much time to play with the set up for this. So it's not a very good pic, but it sure is a GOOD dish!
I know everybody has their own version of Mac-n-cheese, with funky toppings and all that. But I don't like to play with it much, we love the original, unaltered version - the creamy, dreamy kind!

HOMEMADE MAC-N-CHEESE

4 Tblsp butter (the real stuff)
4 Tblsp flour
1 cup milk
1 cup low sodium chicken broth
1 lb Elbow macaroni
8 oz. Velveeta, cubed
2 cups shredded Cheddar cheese

Prepare pasta according to package directions. Drain, return to the pan you cooked it in and toss with a few teaspoons of butter.
In a separate saucepan, melt the 4 Tblsp of butter, add the flour and stir with a whisk until it is combined. Do not let it brown or burn. Add the milk and chicken broth, stirring after each addition. Let it simmer until slightly thickened, stirring occasionally to make sure it doesn't get lumpy. If it seems too thick, add a bit more chicken broth. Remove the pan from the heat and add in the cubed Velveeta chunks. If you leave the pan on the heat after you add the Velveeta, the cheese will sink and stick to the bottom of the pan and scorch (I know this from experience!). Stir until the cheese is melted and combined with the white sauce. Pour cheese sauce over macaroni in pan and stir to combine. Now add a cup of the shredded cheddar and stir that in. Pour macaroni into a sprayed casserole dish and bake at 400 for about 10 minutes - just long enough to get it bubbling. Pull it out of the oven and top with the remaining 1 cup of cheddar and return it to the oven for about 5 or 10 minutes more, until the cheese melts and gets a nice light brown color on top. There's something about a light, crispy, baked top on food, that people love.

Wednesday, July 30, 2008

SALSA BURGERS

I love burgers, but am not too fond of plain ol' boring burgers. LOL I found this recipe a couple years ago and we just love them. They are SO moist and flavorful. They don't do real well on the grill though, because they fall apart easily. I like to do these ones in the skillet. My Honey has done them on the grill before, but usually there will be pieces falling off into the grate. I topped these with Provolone tonight and WOW, they were so good! For those of you that are dieting, you could easily replace the beef with ground turkey and use low fat cheese.

SALSA BURGERS

1 lb ground chuck
1/2 cup salsa (mild, medium or hot, it's your choice)
1/2 cup shredded cheddar
1/4 tsp. ground Cumin
1/2 tsp. salt
1/4 tsp. fresh ground pepper medley
Sliced provolone cheese

Salsa
Ranch dressing

In a mixing bowl, combine the ground chuck, 1/2 cup salsa, shredded cheddar, Cumin, salt and pepper. Mix with hands and form into 4 patties. Heat a large skillet over medium heat. Spray it with cooking spray. Carefully lay the patties in the skillet and cook over med - low heat for several minutes on each side, until done. This is what they look like as they are frying in the skillet. You can see the flecks of veggies in the salsa, and the little shreds of cheese. Mmm! When the burgers are done, top with a slice of Provolone cheese and cover with a lid (or if you don't have a lid that big, use a pizza pan like I do). Butter your hamburger bun and toast it nice and crisp on a griddle. In a separate small mixing bowl, combine equal parts of salsa and prepared ranch dressing. Place burger on bun and top with the salsa/ranch dressing.
Serves 4

*WHAT IS YOUR FAVORITE?* Now will you share with me, what your favorite burger is? Everybody does something different and I just love to hear your ideas! And don't be afraid to include the recipe in your comment. *hint hint* LOL

Saturday, July 26, 2008

What's your favorite meal for company?

What is your favorite meal to fix when you are having company over?
For me, it depends on what day it is. If it's a Sunday, then it's usually a roast chicken or pot roast. If it's a weeknight, it might be steaks on the grill. I'd like to hear what others fix for company though, so let me hear your favorites.


*NOTE* Back from Summer camp and taking a bit of a weekend break from posting recipes. I'll be back to posting new ones on Monday though!

Friday, July 18, 2008

OVEN FRIED EGGPLANT

Before tonight, I had only tried eggplant once. It was an eggplant parmesan dish. It was OK, but I don't think it really gave me a taste of the main ingredient, eggplant. I have been trying to incorporate new foods, especially veggies, into our diet. There are SO many out there that we don't use. I found this recipe for oven fried eggplant and thought it sounded pretty tasty, so tried it out on my family tonight. It was really good and very savory. You can really taste the Parmesan, so if you are kind of so-so with Parm, you may want to only put half the amount called for. We had ours with grilled chicken, but it really would be outstanding alongside a pasta dish with tomato sauce. This recipe originally appeared in "Cooking Light" magazine. This is a non-tradational way to prepare eggplant, but it really cuts the fat and calories (Cal: 122. Fat: 3.9 g). I'll definitely be making this one again.


OVEN FRIED EGGPLANT

Yeild: 4 servings

Ingredients

Directions

  1. Combine first 2 ingredients, stir well.
  2. Spread evenly over both sides of eggplant slices.
  3. Combine breadcrumbs, cheese, and Italian seasoning in a shallow bowl; dredge eggplant in breadcrumbs mixture.
  4. Place eggplant on a baking sheet coated with cooking spray.
  5. Bake@ 425 degrees for 12 minutes.
  6. Turn eggplant over; and bake an additional 12 minutes or until golden.

REAL BAKED POTATOES

Do you wrap your "baked" potatoes in foil to 'bake' them? If so, you need to realize that you are really steaming them, not baking them. If you have ever had a crispy, slightly salty skin on a real baked potato, you'll probably never wrap your potatoes in foil again. These are so good, but so very simple.

BAKED POTATOES

4 small russet potatoes
2 tablespoons extra-virgin olive oil
1 teaspoons kosher or sea salt, plus for seasoning
Freshly ground black pepper

Preheat the oven to 400 degrees F.

Pierce potatoes a few time to allow steam to escape. Toss the potatoes in a bowl with the oil, salt, and pepper until completely coated. Place on a baking sheet and bake until fork tender, about 45 minutes. Split open and garnish with butter, sour cream and chives, if desired. You can also top them with cheese and chopped, cooked bacon.

Thursday, July 17, 2008

FEEDING 100

Just in case some of you, that pop in regularly, think I've gone MIA in the next several days to a week, I'm leaving you a note. Monday is the first day of Summer camp for us. I am the cook, so have been up to my eyeballs in menu prep, and shopping. Today was shopping day. Thankfully, I had plenty of help with me. Both of my girls had the day off work - WOOHOO! Monica, my daughter-in-law came, AND our "adopted" daughter Amy had the day off, Kylie came along, as well as our Summer guest, Brittany. We just made a fun day out of it.

Ever wonder what shopping for 1200 meals looks like? ROFLOL We weren't even half way done when this pic was taken. I will be preparing 12 meals, enough to feed 100 at each one, plus canteen items! Pop, candy, hot pretzels, corn dogs, etc.

These girls are always goofing off! LOLAfter I got my camera back from the girls, I found this pic on it! I wondered where they had run off to! LOL I could hear them giggling in the next aisle over. That's my daughter Sarah on the right goofing around at GFS, trying on the chefs clothing they had out for display! And my daughter-in-law, Monica acting goofy right along with her. I love those girls! They make me laugh!

Tomorrow is a FULL day of cooking for me. I have 40 lbs of ground beef to fry, 30 lbs of chicken breast to saute, 20 lbs of pasta to cook, a gallon of cheese sauce to cook, and whatever else I can find to do BEFORE next week!

I was SOOOOOO excited because while we were shopping at Sam's club today, they had samples out! That's not why I was excited LOL, but because I noticed a lady cooking a chicken dish that I had never had before. I was a bit apprehensive, but tasted it, and right there decided that it would be a new addition to my camp menu next week! It's SUPER SIMPLE and you won't believe the ingredients when I post it next week! *hehe* Remember, I HAVE to fix it and take a pic of it before I can post the recipe. LOL I'll also be posting my recipe for homemade Mac-n-Cheese.
After a busy, hot morning of shopping, we all decided on Red Lobster for lunch. It hit the spot and we had a fun time laughing and chit chatting around the table. I am a blessed woman! I love all these girls, it was like having 10 extra arms today! I didn't have to lift any cans or boxes from the shelves, I didn't have to push or pull any heavy, flat bed carts, laden with goods, I didn't have to load the stuff into the van. What a blessing they all were to me today! And you can tell from the smiles on their faces, that there really is JOY in serving Jesus!

Tuesday, July 15, 2008

CHICKEN QUESADILLA

Don't you just love it when someone else does the cooking for you?! I feel so spoiled. My Honey fried a batch of delicious catfish last night, and then tonight my daughter Sarah made these wonderful chicken quesadillas. They are super easy, and you've probably made them before, but just in case you haven't, here is the low-down on them, so you can try them some time. These would be another good S.N.A.C. snack! Because I wasn't doing the cooking, I was free to roam around, with the camera, and snap "play by play" pics!

CHICKEN QUESADILLAS

3 large boneless, skinless chicken breasts, cut into bite size chunks
Olive oil
McCormick's Fajita seasoning
1 medium onion, diced
1 red bell pepper, diced
4 cups shredded Colby Jack / Cheddar cheese (whatever your favorite cheese is)
1 pkg. Manny's whole wheat taco shells (burrito size)

Heat a heavy skillet over med. high, drizzle olive oil generously over the bottom and place chicken chunks into the oil. Season heavily (sprinkle them 2 or 3 times) with McCormick's Fajita seasoning. Cook 4 to 5 minutes until chicken is done. stirring occasionally. In separate iron skillet, heat olive oil in bottom of pan and place diced onions and peppers. Cook until tender and slightly carmelized. Dump onions and peppers into the cooked chicken and stir to combine. Keep warm. Scrape out the skillet that you fried the onions and peppers in, as best you can with a spatula, because you will be using that skillet to cook the quesadillas in.Now, using the same skillet you used for the onions & peppers (it's already heated and well seasoned) plus, you don't have to dirty another pan, place 1 taco shell in the bottom of the pan, place a handful of shredded cheese on the shell, then a couple spoonfuls of the chicken mixture,then another handful of cheese,then top with another taco shell.Now place a clean, medium size iron skillet on top (or some other heavy object - use your imagination). Don't make fun of my top iron skillet! I know it's ugly. These things take a beating around here! They get used ALL the time. Heat for 1 minute or when golden, remove the top iron skillet, flip the quesadilla (when you flip it, be sure to hold the top shell in place w/ your hand, since the cheese isn't melted on top yet and it may slide. Replace the medium iron skillet and cook the other side for 1 minute or when golden. Remove the skillet and the quesadilla. Using a pizza cutter, cut the quesadilla into quarters and serve immediately. My girls like to serve it with either sour cream or ranch dressing.
*Be sure to use a small drizzle of olive oil in the skillet before you cook each quesadilla - you don't want the shells to stick to the pan.
Makes 4 whole quesadillas.

Monday, July 14, 2008

TABLESCAPES - Seaside table

We don't normally do a tablescape for a weeknight dinner. But my daughter, Hannah set the table for dinner and surprised me with this pretty, sort of seaside combo. She said it was appropriate, since we were having fish and hush puppies for dinner! I thought it was cute, so snapped a pic to share with you on here. I love that set of napkin rings too! They are cut from real shells and are so pretty and shiny. My one regret is that I only have 4 of them, or else I would use them a LOT more. I'm not a big fan of paper napkins. I don't like to waste money on things like that. Now paper towels, that's another story! I CANNOT be without those! LOL We use cloth napkins every night. I have quite a few plain, every day type, cloth napkins. But usually I will put down place mats on the table, rather than a tablecloth.

Anyway, it was a nice surprise to sit down to dinner, on a Monday night, with such a pretty table. THANKS Hannah! You're a real peach and I LOVE YOU! XO

MINI CHEESE BALLS

I made these for a birthday dinner that I catered. They went over so well, I thought I'd share the recipe here. They really aren't rocket science. It's just your average Joe cheese ball recipe, but formed into little tiny cheese balls! I don't think I'll win any awards for that one! LOL
They are quite yummy though, with the different coatings. Serve them with fancy crackers. Super easy!

MINI CHEESE BALLS

1 (8 oz) brick of cream cheese
2 cups shredded cheddar cheese
1 pkg pressed lunch meat, (ham), chopped into small pieces
1 Tblsp Worcestershire sauce
Onion flakes to taste
Chopped pecans
Chopped parsley

Place all ingredients in medium mixing bowl and mix with hands until thoroughly combined. Using a small cookie scoop, scoop out cheese mixture and shape into small balls (about the size of a walnut) Keep 1/3 plain, roll 1/3 in chopped pecans and the remaining 1/3 in chopped parley. Serve with crackers. Be sure to place a container of toothpicks near the tray of cheese balls for easy serving.

*NOTE* In the pic above, you can see I rolled some of the cheese balls entirely in parsley. The next time I make these, I'll only coat 1/2 of each cheese ball in the parsley. Having the entire thing coated, was a bit too much. Too much of a good thing.....

AUTUMN FRUIT SALAD

This isn't a very good pic, but it's all I have, until I make this again and can snap a better one. This is Autumn fruit salad. I know we're in the middle of Summer right now, but I've been updating my catering page, and wanted to place the recipe for this where it could be found. I make this quite often to take to fellowships and it is always well received whenever I prepare it for catered events too. It's super easy and surprisingly yummy. If you didn't know the recipe, you'd be surprised to learn that the dressing is made with yogurt. Don't let that chase you off though - this one is delicious!

AUTUMN FRUIT SALAD

2 medium granny smith apples, unpeeled and diced (I've also used red apples)
Grated peel of 1 lime
1 can (11 oz) mandarin orange segments, drained
1 cup halved, seedless red grapes
1 1/2 cups mini marshmallows
1 (8 oz) container vanilla, low fat yogurt
2 Tblsp chopped pecans, optional

In large serving bowl, combine apple, lime peel, orange segments and grapes. Add marshmallows and yogurt; mix gently. Refrigerate until ready to serve. Sprinkle chopped nuts over top; serve immediately.
Yeild: 12 servings

*NOTE* Don't make this too far in advance, because the marshmallows will get too soft and gooey. What you can do, is mix it all up and leave the marshmallows out until just before you serve it - then toss them in and give it a gentle stir. I've done it this way several times.

KETTLE CORN

We LOVE popcorn in our house. But this one is a special treat. I don't make it real often, but save it for special occasions, like holidays and family gatherings. Or when someone begs me to make it, just because. Don't you just love that sweet / salty combo? This one really hits the mark for that! And it's super easy.

KETTLE CORN

Vegetable oil
1/2 cup white popping corn
1/4 cup white sugar
1/2 stick butter, melted
salt

Gather your supplies so they will be handy. You'll need a long handled wooden spoon. Set your popcorn bowl near the stove. Measure out your sugar into a scoop or bowl, or some kind of container, and keep it sitting right near the stove, where you can reach it quick. Heat enough oil in the bottom of your favorite popcorn popping pan, to cover the bottom of the pan. Pour in the popcorn and let it "fry" for a few minutes, stirring it occasionally. AS SOON AS the first kernel pops, dump in the sugar and start stirring it with the wooden spoon. The sugar will stop the popping action, but don't be alarmed. Keep stirring the popcorn and sugar mixture until it begins to pop again. Place the lid on, and let it continue to pop. Give the pan a good shake here and there to keep the sugar from staying in one place and burning. AS SOON as the popping slows to a near stop, dump the popcorn out into the bowl. Pour the 1/2 stick of melted butter over the top and give it a good stir or shake to coat it evenly. Sprinkle lightly with salt and ENJOY!

SOUTHERN CATFISH

Unless you are a catfish lover, you are probably thinking, Ewwww, catfish? But it's "fishy" tasting! Trust me, it's NOT! The only way it would be fishy tasting, is if you under cook it. This is one of the best white fish you can eat. Very mild in taste and so meaty. The best way to fix it, is to pan fry it. My Honey is the grilling machine and resident fish fryer in our house. He loves to do it and I love to let him! LOL Truthfully, I just like having him in the kitchen near me! *wink wink*

SOUTHERN CATFISH FILETS

  • 6 catfish fillets, about 6 to 8 ounces each
  • 1 tablespoon salt
  • dash pepper
  • 1 cup flour
  • 1/2 cup yellow cornmeal
  • 2 teaspoons paprika
  • Old Bay seasoning
  • Vegetable oil

Preparation:

Clean and wash fish. Shake off excess water. Heat oil in a large skillet over medium high. In a pie plate or shallow dish, combine flour, cornmeal, paprika, salt, pepper and Old Bay seasoning. Roll fish in flour and cornmeal mixture. Fry fish in hot oil for about 4 minutes. Turn carefully with a spatula and fry for 4 to 6 minutes longer, or until fish flakes easily with a fork and is browned. Drain on paper towels. Serve with hush puppies and coleslaw, if desired.
Serves 6.

HUSH PUPPIES

Do you love a mess of fish and hush puppies as much as we do? My Honey can fry a mean batch of catfish and I always whip up the hush puppies to go with it. We had a discussion during dinner tonight, over the origin of the word, hush puppies. This is what I found.

Hush puppies are a favorite accompaniment to fried catfish, and are often served with other types of fried fish. Also known as corn dodgers, hush puppies are deep-fried little cornmeal breads. The popular legend surrounding the hush puppy takes us back to Civil War days. Southerners would sit beside a campfire, preparing their meals. If Yankee soldiers came near, they would toss their barking dogs some of the fried cakes with the command, "Hush, puppies!"
HUSH PUPPIES

6 cups vegetable oil
1 ½ cups self rising cornmeal
½ cup self rising flour
½ tsp baking soda
½ tsp salt
1 small onion
1 cup buttermilk
1 egg, lightly beaten

Prepare the oil for frying in a skillet. Preheat it to 350 degrees. In a mixing bowl, stir together the cornmeal, flour, baking soda and salt. Stir in the onion. In a small bowl, stir together the buttermilk and egg. Pour the buttermilk mixture into the dry ingredients and mix until blended - don’t worry if there are a few lumps. Drop the batter, one teaspoon at a time into the oil. Dip the spoon in a glass of water after each hush puppy is dropped. Fry until golden brown, turning the hush puppies and during the cooking process.

LEFTOVERS

What is your favorite way to use leftover mashed potatoes?

RICE KRISPIE ICE CREAM DESSERT

FINALLY! Here it is Mike! ROFLOL Amy's husband has been waiting VERY patiently for this one. I made it for a fellowship last night and came home with an empty pan. THAT'S a sign of a good recipe! This is one of my signature desserts. I can't believe I'm sharing it! LOL
I've made it so many times, I could do it with my eyes closed. You have GOT to try this one! You won't believe how good rice krispies can taste with ice cream! There not just for breakfast anymore! Just so you know, you probably need to walk an extra mile on the treadmill if you plan on indulging on more than one piece of this!

RICE KRISPIE ICE CREAM DESSERT

6 cups rice krispies
1 cup chopped pecans
1 stick butter
1/2 to 3/4 cup brown sugar
* 1 gallon ice cream
1 jar caramel ice cream topping

Remove ice cream from freezer 10 minutes before starting, to let it soften a bit. In a large skillet, over med heat, melt the butter. Add the rice krispies and the pecans and stir until the butter is evenly distributed throughout, and the cereal and pecans are lightly toasted. Remove the pan from the heat and stir in the brown sugar. Stir until the sugar is well combined with the cereal and pecans. In bottom of large baking pan (I like to use a lasagna pan) evenly sprinkle half of the cereal mixture. Spoon the softened ice cream carefully on top. Once you have all of the ice cream on top of the mixture, you can press it down to seal the edges and any empty spaces. Now sprinkle the remaining half of the cereal mixture over the top. Cover with plastic wrap and place in the freezer until firm. Just before you serve it, warm your caramel topping in the microwave and drizzle it generously over the top of the ice cream.
*NOTE* You need to use good quality ice cream for this dessert. NOT the stuff in the plastic pails. That "stuff" just doesn't melt right and gives it a funny taste. I like to use Hudsonville, but have also used Bryers, when I can find it on sale.

TABLESCAPES - Green table

This was our table yesterday. We went simple with the greenery and flowered napkin rings. When I got home from my bus route, my girls had dinner mostly done. So I went in the dining room and finished up the table.


I collect napkin rings. This is one of my favorite sets. I got this set on clearance at a local department store. They are large Gerber daisies, 4 yellow and 4 lavender. I just love them!

We only had 1 guest yesterday. This is Kylie (on the right) with our daughter, Hannah - she is leaving for Bible college in a couple weeks, and we wanted to have her over before she left.
Pray for Kylie, when you see this picture. She lost her Daddy just 6 months ago, but is going on to finish what she started. And that's just one of the reasons why her Daddy was so proud of her. We love you Kylie!

FUDGE BROWNIE TRIFLE

Don't you just love the look of a pretty trifle? This one is compliments of my sister-in-law, Julie. We were there (Northern MI), last week for my brother-in-law's annual tent meeting. My Honey and his brothers (Tharp Brothers) all sing and preach and they were invited to do that last week. It was a mini family reunion, as 2 of their 3 sisters were there also. Anyway, I watched very intently, with camera in hand, as Julie put this together! I asked her if I could post her recipe and she graciously agreed. So THANKS Julie!

Double Chocolate Toffee Trifle
1 pkg. (18.25 oz.) brownie mix - prepared according to pkg directions.
2 c. Frozen whipped topping, thawed ( I use a bit more)
2 c. White chocolate instant pudding and pie filling
3 toffee bars (1.5 oz each-such as heath bars)
Make brownie mix according to the package. Cool completely. In mixing bowl whisk milk and pudding mix until mixture thickens. Fold in whipped topping. ( I save some whipped topping for the last layer for garnish) Cut brownies in 1" cubes. Chop toffee bars with a food chopper. Layer 1/3 of brownie cubes into bottom of trifle bowl. Top with 1/3 of pudding mixture. Top with 1/3 of chopped toffee. Repeat layers two more times. Chill 30 min. Before serving.

SMOTHERED CHICKEN

I found this recipe years ago, when we were passing through the hills of West Virginia. We stopped at a little road side shop for some snacks and I zeroed in on a small rack of cookbooks! LOL This was just a little paperback book, with maybe 50 pages in it. It's called "Ma's Cookin' - Mountain recipes." I liked it because not only does it have some good recipes, but it is laced with all sorts of mountain customs, sayings and superstitions. This recipe for smothered chicken, was the first one that I tried from the book. It has remained a family favorite and one of my Honey's all time favorites, ever since.

SMOTHERED CHICKEN

This is how they introduce most of the recipes in the book:

Don't know 'bout most folks - but wuld ruther hev my chicken kilt fer cookin' by choppin' off his head as usual. Wal anyways, here goes:

1 whole chicken, cut in pieces
Flour for dusting
Lawry's seasoned salt
Ground black pepper
Garlic powder
6 slices bacon
1/2 medium onion, sliced
Celery leaves, for top

Preheat oven to 350. Season flour with Lawrys, pepper, and garlice powder. Roll chicken in flour, and lay in baking pan. Lay bacon slices over the top. Cover with onion slices. Top with celery leaves. Pour water in bottom of pan and bake at 325 for 2 hours.
*NOTE* I have also, at different times, used the celery stalks. I lay them on the bottom of the pan and then lay the chicken pieces on top of them. It just depends on how much you like the taste of celery. I thought it gave it a much richer flavor and the family agreed.

This is one of the mountain sayings in the book:

A whistlin' woman an' crowin' hen are shore to cum to sum bad end!

Monday, July 7, 2008

DO ME A FAVOR?

Would you all please do me a favor? If you happen to stop by, please jot me a note and let me know, first of all, that you were here, where you're from, but also, how you found the site. I am interested in knowing how you heard about it or happened on it. I'm seeing visitors from foreign countries and it intrigues me. Then last night I heard from a sweet Pastor's wife in WA. Don't forget, if you don't have a google account, you can use the chat box, to the right, to leave me a note.
Thanks so much!

HASH BROWN CASSEROLE

Shhhhhhh! Don't anybody tell my Honey that I posted a recipe on my blog, using the word casserole! LOL Actually, this is one of his favorites. Occasionally we'll have "breakfast" for dinner. Such was the case tonight. Although, this isn't just a "breakfast" recipe. It goes well with chicken, ham, etc. Tonight I fixed scrambled eggs - well actually my Honey made the eggs. I was up to my neck watching the bacon in the oven, waiting for the hash brown casserole to come out of the oven and at the same time, frying my pancakes! LOL And it was all happening at the same time. I'm telling you, sometimes getting all the food done at the same time is a real challenge! I like to make my hashbrown casserole in an old Pampered chef stone bowl that my Honey bought me on ebay. I love that thing! It gives a nice crispy edge and bottom to this casserole. This is one of those "night before" recipes too! You can mix it up the night before and then just pop it in the oven the next morning. Super easy!

HASHBROWN CASSEROLE

1 (32 OZ) bag frozen hashbrowns (thawed)
1/2 cup melted butter
1 tsp. salt
1/2 tsp. black pepper
1 can Cream of chicken soup
1 pint sour cream
1/2 cup chopped onion
2 cups shredded cheddar cheese

Topping:
2 cups crushed corn flakes
1/2 cup melted butter

Preheat oven to 350. Combine 1/2 cup melted butter, salt, pepper, soup, sour cream, chopped onion and cheddar cheese. Pour over thawed hashbrowns and stir well to combine. Place in casserole dish, sprayed with cooking spray. Sprinkle crushed corn flakes over the top and then drizzle the remaining 1/2 cup melted butter, evenly over the top. Bake uncovered at 350 for 45 min. to an hour.

*SPECIAL NOTE* Did you know you can cook your bacon in the oven? I do it all the time. It's so nice not to have all that grease to clean up on the stove top. Not to mention the grease stains on your clothes, when the bacon POPS on you! I use my baking sheets, give them a quick spritz with cooking spray so the bacon won't stick, then lay around 12 slices on it. I bake them at 375 for about 10 - 15 min, depending on your oven. Just watch it closely. Some people like their bacon crispier than others. Oh yes, I flip them over, half way through the cooking time too.

OAT BRAN PANCAKES

Mmm!! See the crispy edge?! That's one perfect pancake!
Before any of you malign me for this one.... I've been making pancakes for years and I'll just confess right away that I LOVE LOVE LOVE Krusteaz pancake mix! I'm sorry. I'm sure you have the best homemade pancake recipe this side of Texas, and I'm sure it's good, light, fluffy, etc. etc. etc. But I just LOVE Krusteaz! LOL It makes the lightest pancakes I've EVER had. I don't like the heavy, dense pancakes that sit in your stomach like a lead ball after you've eaten them. And I don't like mushy ones either. My father in law always told me I made the best pancakes in the world and I just believed him! As a matter of fact, the day he passed on into Heaven, I had just made a fresh batch that morning and my Honey took some over to him, because he loved them so much. I will forever be glad that I wrapped up a plate for that precious man that morning! ~*sigh*~ I know he's enjoying things far better than Krusteaz pancakes in Heaven, but I really miss him...

Anyway.... sorry..... back to the pancakes. I normally use the regular mix, but I really do try to watch our health and eat as healthy as we can. I picked up the Krusteaz, low fat, Oat bran mix the other day. And OH MY SOUL are they ever good!! There are only 3 g of fat in the mix. But 4 g of fiber.
The first thing I smelled when I mixed them up was cinnamon. Mmm! I added chopped pecans and a tsp of vanilla to the batter too. Then when they came out of the iron skillet (because all of us pancake conossieurs know, that the best pancakes are made in an iron skillet, with a little oil drizzled in it, to create that highly sought after "crispy edge" ;-), we topped them with fresh fruit - strawberries, blueberries and bananas. Then we gave them a small dollop of whipped cream and a little sprinkle of nuts again. They didn't need anything else. They were sooooooo good! I have to confess also, that I tried a 2nd pancake! There I said it! But, as you can see in the pic at the top, they weren't very big. On that one I put sliced bananas, chopped pecans and a drizzle of syrup. Oh my soul! WOWOWOWOW!
So there's my commercial for Krusteaz! I highly recommend this product.

Sunday, July 6, 2008

TABLESCAPES - Blue table

This was our tablescape for todays Sunday dinner. My daughter, Sarah had been out shopping and stopped at a linen store that was going out of business and she picked this set up for around $15 or so. It's a nice lightweight linen tablecloth and matching napkins. We only had 8 blue, so we added in a few white here and there. I love this flower arrangement. It's funky and different! Plus it's tall enough to stay on the table during the meal and not block anyone's view of others seated at the table.


This is the napkin fold we did today. It is the rose. The napkins weren't stiff enough to do the water lily. If you're short on time, you can always just fluff the napkin inside the empty water goblets. That makes for a pretty look to the table as well. I'm also a big fan of napkin rings and have several sets in my collection. My favorite ones are big gerber daisies. I have 4 yellow and 4 purple. They make my Spring table just BEEautiful!
If you'd like to try a few napkin folds yourself, for Sunday dinner, you can learn 27 different napkin folding designs here: Napkin folding.

These aren't the greatest pics. I was just beginning to snap pics today and my batteries died! Figures! Do you know how nerve racking it is to cook for a chef? This is the family we had over for dinner today. David and Carmen Iseminger. He is our local church evangelist, but he's also a chef! He offered to make dessert for today and you know what? I LET HIM! LOL He made Caramel pecan apple pie (to die for!) and Chocolate truffle pie. Here we are getting ready to serve up dessert. He and his wife Carmen, are doing the honors and everyone is fixated on the pies before us! They really were super good. The rest of the gang waiting their turn for dessert. You can see his daughter Lena, in the background (in the pink shirt), after her first taste of the Chocolate truffle pie! That was the first time he had made either one, but you sure couldn't tell!

LET'S TALK STEAK


My Honey is the KING of the grill in this household! He says "Real men don't let women do the grilling!" I think it's because he thinks women CAN'T grill! LOL I just honestly don't do it because he seems to enjoy it so much. And plus he's stinking GOOD at it! You can see, on the steaks in the pic, where he was playing with the branding iron that the kids bought him for Father's day one year. We bought him a smoker for Father's day a couple years ago and he can make that thing stand up and dance! He used it to fire grill these steaks. He didn't use gas or charcoal to cook these babies! It was wood!
He makes a mean steak and it's about the only time I truly enjoy eating steak, when he cooks it.
He can buy the absolute cheapest cut of steak and make it so tender, it will practically melt in your mouth. He always uses Lawry's meat tenderizer on it first. He sprinkles it liberally with the tenderizer and then pokes it with a fork everywhere. Then he pours Stubbs steak marinade over it and lets it sit and come to room temperature before he grills it. But if we are out of Stubbs, he just drizzles it with olive oil, sprinkles it with kosher salt and fresh ground black pepper and rubs it into the meat. It's just as tasty that way.

Some things to remember when grilling steak:

Choose a well marbled cut of meat, such as a rib-eye, T-bone, or New York strip. Or you can be cheap like us and buy chuck steak. *hehe* Seriously though, if you can find a better cut of meat on sale, it's SO worth it to get the better one. Chuck steaks can tend to be kind of fatty though. If your steak has a large amount of fat around the outside, make cuts in 2" intervals around the outside edge. Cutting just through the outer layer. Make sure not to cut into meat. This will help keep the steak from curling during grilling. And for goodness sake, DON'T stick a fork in it while you're grilling! Use tongs to turn it. After you grill it, let your steak rest, uncovered for at least 5 minutes. This allows the juices to redistribute and settle before you cut into it.

TIME TABLE for grilling steak.

3/4" steak:
Med rare: 2 min each side
Medium: 3 min each side
Medium well: 4 min each side
Well: 5 min each side

1" steak
Med rare: 3 min each side
Medium: 5 min each side
Medium well: 6 min each side
Well: 7 min each side

1 1/2 " steak
Med rare: 6 min each side
Medium: 7 min each side
Medium: 8 min each side
Well: 9 min each side

* Times will vary slightly depending on outside temperatures, wind conditions, and heat fluctuations in grill.

ROASTED VEGGIES

If you've never tried roasting veggies, you're missing a real taste treat! They have an ALL together different flavor than boiled, microwaved or even steamed. I think their real flavor comes out best, when you roast them. And it's SUPER easy. You can use whatever your favorite veggie combo is too. I like to use zucchini and summer squash as the base and then toss on whatever else I have on hand. Today, it was fresh green beans. But I've also added broccoli and cauliflower to the mix. I'm not a big fan of cauliflower, but I do like it roasted. Today a friend suggest that you could also add eggplant, although I've never tried that one yet.

ROASTED VEGGIES

2 medium size zucchini squash
2 medium size summer squash
1 head broccoli
1/2 head cauliflower
1 lb fresh green beans
Olive oil
Kosher salt
Fresh ground Peppercorn medley (McCormick grinders)

Preheat oven to 400. Slice zucchini and summer squash in half lengthwise, and then into 1/2" slices. Pile veggies onto baking sheet. Cut broccoli and cauliflower into bite size florets and dump onto baking sheet with squash. Snip the stem end off of the green beans and pile whole onto baking sheet, with other veggies.
Drizzle olive oil generously over the veggies. Sprinkle liberally with kosher salt and fresh ground peppercorn medley. Roast at 400 for 10 minutes. Slide pan out on oven rack and flip the veggies over. Roast another 10 minutes or until veggies are light golden brown, but still crisp tender.
Watch closely, as oven temperatures vary. This is what the tray usually looks like before they go in the oven. This one didn't have the green beans on it. In the pic at the top, I had green beans, but no broccoli. LOL It's just whatever strikes your fancy that day!

Friday, July 4, 2008

BANANA SPLIT CHEESECAKE

OH MY SOUL!!!!!! I love my Hot fudge pudding cake, but seriously, I think THIS has become my new favorite dessert! I made this for our 4th of July dinner today and it is INSANELY delicious! (what about the "flag cake" you ask? Been there done that, several years in a row! LOL) You freeze this cheesecake, so it gives it the texture of ice cream, which makes it taste even more like an actual banana split. It is just stinking good! You simply MUST try this one!
One thing about this recipe, is the fat and sugar content have been paired down considerably, but you SURE don't miss it. Nobody would ever know this was a low sugar, low fat dessert!

BANANA SPLIT CHEESECAKE

* 1 can (8 ounces) unsweetened crushed pineapple, divided
* 2 medium firm bananas, sliced
* 1 reduced-fat graham cracker crust (8 inches)

* 1 package (8 ounces) fat-free cream cheese
* 1-1/2 cups pineapple sherbet, softened
* 1 package (1 ounce) sugar-free instant vanilla pudding mix
* 1 carton (8 ounces) frozen reduced-fat Cool Whip® whipped topping,
thawed, divided
* maraschino cherries
* chocolate syrup
* caramel ice cream topping, warmed
* chopped pecans


Directions:
Drain pineapple, reserving juice. In a small bowl, combine bananas and 2 tablespoons reserved juice; let stand for 5 minutes. Drain bananas, discarding juice. Arrange bananas over bottom of crust; set aside.
In a large mixing bowl, beat cream cheese and 2 tablespoons reserved pineapple juice. Gradually beat in sherbet. Gradually beat in pudding mix; beat 2 minutes longer. Refrigerate 1/3 cup pineapple until serving; fold remaining pineapple into cream cheese mixture. Fold in 2 cups
whipped topping; spread evenly over banana slices. Make sure the pie is not mounded excessively. Try to spread the filling so it's fairly level. This will make garnishing it, much easier. Cover and freeze until firm.
Remove from the freezer 10-15 minutes before serving. Arrange
reserved pineapple around edge of pie. Drizzle pineapple decoratively with chocolate syrup and then with warm caramel topping. Sprinkle chocolate & caramel with chopped pecans. Place 8 or 10 maraschino cherries around the edge on top of chopped nuts. Dollop remaining whipped topping onto center of pie. Sprinkle with pecans; top with another cherry or two (or three!). Yield: 8 - 10 servings.
ENJOY!
Can you tell someone likes cherries? LOL

CRUSHED HOT POTATOES


This has become one of our new favorite ways to make potatoes. They have so much more flavor than a regular baked potato. And if the fancy strikes you, you can plop a dollop of sour cream in the middle of them when they are done, or even a spoon of Ranch dressing. Or you could make them "loaded" crushed hot potatoes by topping them with cheese, bacon and sour cream. They are perfectly fine just plain though. My compliments to the Pioneer Woman for this one!


CRUSHED HOT POTATOES

Potatoes (as many as you need to feed your gang - 1 each usually)
Olive Oil
Kosher salt
Fresh ground black pepper
Fresh herbs (your favorite)


Begin by bringing a pot of salted water to a boil. Add in as many potatoes as you wish to make, and cook them until they’re fork-tender.
Next, generously drizzle olive oil on a sheet pan. This will mean the difference between the potatoes sticking and not sticking. When the potatoes are tender, place them on the cookie sheet. Give them plenty of room to spread out. Next, grab your potato masher and gently press down on the potato until it slightly mashes.
Then rotate the masher 90 degrees and finish flattening it. Of course, you don’t want to absolutely smash it into the pan—you want it almost to resemble a cookie. Repeat until all are flattened. And really, I don’t know why you couldn’t use the bottom of a glass for this step if you don’t have a potato masher. The surface might not be as textured and interesting, but I think it still might work. Next, brush the tops rather generously with olive oil. Next, grab some Kosher salt. You can use regular salt, but I’d really recommend using kosher. It adheres to the potatoes more easily and really flavors them nicely without getting too salty.
Remember: potatoes need salt. Don’t skimp! Be as generous with fresh ground black pepper. Now, you can grab some chives, or thyme, or whatever herbs you have available. Whatever herb you use, just chop it pretty finely and sprinkle over the top. Now throw them onto the top rack of a very hot (450-degree) oven, and cook them for 20-25 minutes… .Or until they're golden and crispy and sizzling.

What's your favorite?

What's your favorite type of skillet to cook in? Is it heavy duty aluminum, nonstick, cast iron, porcelain coated cast iron? I don't even know what all the types of skillets are, out there.

I would have to say mine is my trusty iron skillet. My Honey bought me 2 or 3 on ebay several years ago. I use them all the time, especially the large one. You just can't go wrong with it. It cooks nice and even and makes the BEST batch of fried chicken you'll ever sink your chompers into! Works tremendous for making a mess of fajitas too! It served me well the other night too, when our power went out and I had to cook dinner on the gas grill outside. I put my potatoes and onions in it and set it directly on the grill grate. Worked like a charm. The thing is virtually indestructible!