Sunday, June 29, 2008

HOT FUDGE PUDDING CAKE

OH MY SOUL!! I am so excited that I FINALLY get to post this recipe! This is an all time family favorite around here and it is literally TO DIE FOR! The first time we had this we were at someone's house for dinner. When we walked in, the lady of the house had just taken it out of the oven, and my Honey says, "Oh man! Sorry about your cake!" Little did he know! LOL Now he says it's a religious experience!
If you like chocolate, this one will make you weep!
I tried to get a decent pic of the vanilla ice cream WITH the hot pudding still on it, but it insisted on sliding right off. That's vanilla ice cream though. Be sure to use a good QUALITY ice cream, like Bryers, to get the full affect of this dessert. None of that stuff in the plastic pail! That stuff is ice cream sacrilege! *hehe*

HOT FUDGE PUDDING CAKE

1 cup flour
2 teasp baking powder
1/2 teasp salt
3/4 cup white sugar
3 Tblsp cocoa
1 1/2 cups milk
2 Tblsp oil
1 teasp vanilla

3/4 cup brown sugar
2 Tblsp cocoa
1 cup hot water combine with 1 cup coffee (can just be leftover from that morning)

In mixing bowl, combine first 8 ingredients. Mix well with whisk and pour into sprayed 9 x 13 baking pan. The batter will be very thin. Don't worry, this will be come the "pudding." Now sprinkle the brown sugar evenly over the top of the batter. DO NOT STIR. Then evenly sprinkle the 2 Tblsp of cocoa over that. Again, DO NOT STIR. Now SLOWLY drizzle the hot water & coffee combo evenly over the top - once again DO NO STIR. Place it carefully in your oven and bake at 350 for 30 minutes. DO NOT overbake it. The pudding will be on the bottom and the "cake" part will be floating in the middle. Don't worry if it looks like it's not "done." It IS! Trust me on this. Serve it piping hot over a dish of ice cream! Prepare to enjoy NIRVANA! LOL

This is what mine looks like when it first comes out of the oven. When you first take it out, it will look like it's at the top of the pan. But as soon as you sit it on the counter, it will go POOF and sink! It's OK. Don't pass out and think it's a failure. You can see in the dead center how it looks cracked with "liquid" bubbling up in the middle - you WANT this.
The more "pudding" there is, the better it is. Although the cake part is good too!

TABLESCAPES

I LOVE this vase (or whatever it is!). We use it literally year round. You can put anything and everything inside of it according to the seasons or holidays. Today my daughter, Sarah set the table all in purple and yellow. So she put a large pillar candle down inside of the vase and then tossed in my purple and yellow daisy napkin rings around it. Too stinking cute! I think so anyway!
The girls were already setting the food on the table before I was able to snap a pic. They are still getting used to Mom taking pictures of ANYTHING to do with dinner! LOL But the tablescapes are a newly added label. So hopefully next Sunday we can get a decent pic of the table before the food gets put out!

PASTOR'S ROAST CHICKEN

YUM! More times than not, if you get invited to our house for Sunday dinner, this is what you will be looking at when you sit down to the table! LOL We probably eat roast chicken for Sunday dinner at least every other Sunday. To say my Honey loves chicken, is an understatement! He said there are only 3 kinds of chicken that he won't eat: Burned chicken, raw chicken and NO chicken! LOL He also says his belt is a fence around a chicken graveyard! Let's see, he also says one of the fruits on the tree of life, in Heaven, is going to taste like chicken! He truly could eat chicken every night of the week, as long as I throw in a nice juicy steak occasionally! LOL (like we can afford that!) When he was growing up, his Momma always made roast chicken on Sunday, so there is a lot of sentimentality attached to this meal. Anyway, this is one of the easiest things a person can make. I can make it blindfolded, with both hands and one foot tied behind my back! Oh wait! I'm giving away my best kept cooking secrets! I'm not afraid to bake things in my oven while I'm at church either - things like this anyway, that I cook low and slow. So these are perfect for us.

PASTOR'S ROAST CHICKEN

1 whole medium size FRYING chicken (I think the roasting chickens are too tough)
1 whole onion
2 cloves garlic
Couple sprigs of Fresh thyme
Sea Salt
Cracked black Pepper
Lawry's seasoned salt
Garlic powder

Preheat oven to 300. Rinse your chicken inside and out. Place in a small roasting pan. Cut your onion in 1/4's place 2 of them inside the chicken. Slice the remaining 2 quarters and scatter them over and around the chicken. Peel the garlic cloves and give them a good smash with the side of your knife. Place them inside the chicken with the onions. Place your fresh thyme inside the chicken also (or whatever your favorite fresh herb is). Sprinkle the chicken liberally with the sea salt, Lawry's seasoned salt, and the garlic powder. Grind up some cracked black pepper over it. Pour a cup or so of water around the edge of the chicken and place the roaster in the oven and bake for 3 - 4 hours at 300. This is "low" for my oven, but my double oven was installed just after Noah got off the ark too. Yours might be newer and you might have to go to 275 or so. If you bake it too high, the chicken will dry out. But the trick is to bake it low and slow. I put this in the oven UNcovered just before I leave for Sunday school and when we get home from church, about 12:30ish (we live right next to the church), we walk in the door to the most wonderful smell this side of Heaven! Now if the chicken is done, but not brown enough on top for you, then just bump up your oven to 375 or 400 and give your chicken a few minutes to brown up. Mine are usually just right though. The fat from the skin, makes them nice and brown. Serve this with a nice heaping pile of mashed potatoes and perfect gravy! Throw in some hot buttered corn, a croissant roll and a nice tall glass of sweet tea, and you've got Sunday dinner! Would you like white or dark?
Wait, what time did you say to be there? LOL

Friday, June 27, 2008

CANDY BAR CAKE

CHOCOHOLICS REJOICE! If you love chocolate, this is the cake for you! Be sure to have a TALL glass of cold milk standing by to serve with this though. This cake is SO simple, but so yummy. I made this for my daughters birthday and we drove 2 hours to visit her at the college she attends. We had cake and ice cream in the kitchen of their dormitory. Before too long, there were more than several dorm students kind of hovering around until we invited them to sit and have a piece of cake with us! LOL

CANDY BAR CAKE

1 chocolate cake mix, prepared according to package directions.

Frost your double layer chocolate cake with chocolate icing. Line the outside edge with Kit Kat bars nestled up next to each other. You may have to trim them a bit to fit the height of the cake. Wrap a colorful, wide, fabric ribbon around it and tie it in a bow. Fill the top side of the cake with chocolate kisses, Hershey's peanut butter cups, or whatever is the favorite candy of the lucky person receiving this. I was kind of "skimpy" with the candy on top of this one, but feel free to pile it on! The more candy there is, the better the presentation!

PIZZA RUSTICA


I was so happy with the way this recipe turned out. Talk about a HEARTY dish! Wowzers! 1 piece of this with a big ol' salad and you are set for dinner. Don't let the length of the recipe scare you off, it really is simple to fix and well worth the effort! You won't be sorry you took the time to roll this one out! On a side note, we aren't big fans of Italian sausage, so we substituted regular pork sausage, and diced deli ham. And it was wonderful!

PIZZA RUSTICA

2 tablespoons olive oil
8 ounces hot Italian sausage, casings removed
1 teaspoon minced garlic
2 (12-ounce) bunches fresh spinach, stemmed, coarsely chopped (about 12 cups), or 1 (10-ounce) package frozen cut-leaf spinach, thawed and drained

1 (15-ounce) container whole milk ricotta
12 ounces mozzarella cheese, shredded

1/3 cup plus 2 tablespoons freshly grated Parmesan
4 ounces thinly sliced prosciutto, coarsely chopped
4 large egg yolks, beaten to blend
Pastry Dough, recipe follows
1 large egg, beaten to blend


Position the rack on the bottom of the oven, and preheat the oven to 375 degrees F.

Heat 1 tablespoon of oil in a heavy large frying pan over medium heat. Add the sausages and saute until golden brown, breaking the sausage into pieces, about 5 minutes. Add the garlic and saute until fragrant, about 1 minute. Transfer the mixture to a small bowl and set aside to cool.

Meanwhile, heat 1 tablespoon of oil in the same frying pan over medium heat. Add the spinach and cook until the spinach wilts and the juices evaporate, stirring often, about 10 minutes. Cool to room temperature. Squeeze the spinach to drain as much liquid as possible.

Into a large bowl, add egg yolks and beat lightly. Stir in the ricotta, mozzarella, and 1/3 cup of Parmesan cheese. Add the sausage, the spinach and prosciutto to the mixture and stir to combine.

Roll out larger piece of dough on a lightly floured work surface to a 17-inch round. Transfer the dough to a 9-inch springform pan. Trim the dough overhang to 1 inch. Spoon the ricotta mixture into the dough-lined pan. Roll out the remaining piece of dough into a 12-inch round. Place the dough over the filling. Pinch the edges of the doughs together to seal, then crimp the dough edges decoratively. Brush the beaten 1 large egg over the entire pastry top. Sprinkle the remaining 2 tablespoons Parmesan over the top. Bake on the bottom shelf until the crust is golden brown, about 1 hour.

Let stand 15 minutes. Release the pan sides and transfer the pizza to a platter. Cut into wedges and serve.

Pastry Dough:
3 1/2 cups all-purpose flour

3/4 cup (1 1/2 sticks) cold unsalted butter, cut into pieces
1/4 cup cold solid vegetable shortening, cut into pieces
1 teaspoon salt
3 large eggs, beaten to blend
2 to 4 tablespoons ice water

Blend the flour, the butter, the shortening and salt in a food processor until the mixture resembles coarse meal. Blend in the eggs. With the machine running, add the water 1 tablespoon at a time until the dough forms. Gather the dough into a ball. Divide the dough into 2 pieces, with 1 piece twice as large as the second piece. Flatten the dough pieces into disks. Wrap in plastic wrap and refrigerate until the dough is firm enough to roll out, about 30 minutes.

Yield: 2 dough pieces (enough for 1 Pizza Rustica)
Prep Time: 15 minutes
Inactive Prep Time: 30 minutes

I thought this pic was funny - my daughter Hannah totally approved of this one! LOL


BRUSCHETTA

We have a Summer house guest named Brittany. She is a Navy brat! Her daddy did a tour in Italy as a deep sea diver. During her stay there, her Momma picked up some wonderful Italian recipes. This is one of them. She happily shared her Momma's recipe with us tonight, so we could serve this DEElicious treat to the ladies that had gathered for an Arbonne makeup party here. Most Bruschetta I have eaten is not cooked, it is more like Pico de Gallo. But this one is cooked and sooooo yummy! This would be another good S.N.A.C. snack (hehe)

BRUSCHETTA

8 - 10 Roma tomatoes (unless they're small, then 12)
1/2 white onion, diced fine
3 cloves minced garlic
1/3 cup Fresh basil, chopped
Crushed red pepper flakes, to taste
Sea salt
McCormick grinders - Italian seasoning, to taste
Olive oil - enough to generoulsy coat the bottom of the pan
French baguette bread, sliced and toasted
Fresh grated Parmesan cheese for the tops

Place oil in pan and heat on medium heat. Grind in Italian seasoning, add the pepper flakes and the sea salt, toss in garlic. Simmer for just a minute or two. Add the onion and let it carmelize for a few minutes. Then add the basil and let it simmer for a minute.
Add tomatoes and remove pan from heat.
Brush bread slices with olive oil and place them on a cookie sheet. Bake at 375 for about 5 minutes, or until crispy.
Top the bread slices with Bruschetta immediately before serving and garnish with freshly grated Parmesan.

LET'S TALK ABOUT PERFECT GRAVY

I sat next to a newly married lady this afternoon and she commented that she had difficulty making gravy without lumps. So I took a few minutes to give her some tips, but was quick to add that I've never had lumpy gravy so I couldn't truly empathize with her. LOL I'm so compassionate. I try hard. haha Smooth gravy is one of my passions! I LOVE making a nice bowl of creamy gravy that is smoother than a baby's bottom! A couple weeks ago, my girls got home before me from church (I was driving my church bus route) and when I walked in the door and looked at the dinner preparations going on (my girls are tremendous cooks) someone had already made the gravy!! How dare they?! I couldn't help myself, I looked at it, gave it a stir, tasted it..... haha. I think I even thickened it a bit more! I'm so bad! I just love making gravy!

There are several important things to remember when making gravy.

* Make sure the broth or base you intend to thicken, is boiling.
* Make sure the thickener you are using is well stirred with no lumps in it.
* Be sure to stir continually while you slowly pour your thickening into the gravy.

You can thicken your gravy 2 different ways: flour and water, or cornstarch and water.
If you use cornstarch, it is equal parts of cornstarch and cold water, mixed well with a fork or whisk. I like to use flour and water, that's just my personal preference. I use a Mason jelly jar, fill it half way with cold water, add 1/2 cup of flour, screw the lid on and give it several good hard shakes. When I take the lid off, I always check to make sure there are no lumps inside the jar to begin with. If there are, I fish them out with a fork.
I get my broth to the boiling point, and slowly drizzle in the flour thickening, continually stirring with my handy dandy whisk. Season it with salt and pepper and VOILA! PERFECT gravy!

Now perchance you have a disaster, don't toss your gravy and serve naked potatoes. YIKES! There are a couple ways to recover from the tragedy of LUMPY gravy. First, you can strain it through a wire mesh strainer. That would probably remove most, if not all of the lumps. If it's "really" lumpy, dump it in the blender and give it a good whirl! Or if you have one of those new fangled hand blenders, pop it in your pan of gravy and give it a good stir.

But whatever you do, DO NOT serve lumpy gravy!

BAKING TIPS


When baking chocolate cakes from scratch or using a box mix, substitute a cup of cold coffee or cappuccino (use your favorite flavor) in place of the cup of water.

Thursday, June 26, 2008

TROPICAL TABLE THEME

Do you ever do fun table themes for your family dinners? If not, you really should sometime, just to surprise your family. We were in the middle of a long room remodeling project (actually the dining room where this was done, that's why the room looks unfinished!) and I needed a night of just whimsy. I had most of the things I needed for this table theme, already around the house. The sarong I laid over a coordinating tablecloth. Most of the other things you can find at your local dollar store. The colorful fish plates, the paper umbrellas in the goblets, the silk leighs, the hawaiian girl, etc... The bamboo candles my daughter bought at the Hobby lobby for my birthday one year. She's always getting me things for my table themes! LOL Anyway, just wanted to encourage you to break "out of the box" a bit for your next dinner time and do something FUN for your family! Your kids will LOVE it! And who knows, you might even get your Honey to raise an eyebrow too! LOL
If you've done something like this in the past, please take a minute to comment and share your fun table themes with me. I'm always ready to hear more ideas!

BUFFALO CHICKEN DIP

This is one of those good S.N.A.C. (Sunday Night After Church) recipes. If you're having a few friends over after church Sunday night or just need a quick dip to take to a fellowship, this one works great. It's pretty hardy too. Teens love it, they love anything hot! If you take this to a church fellowship, I'd put a note by it though, stating that it's spicy hot. Some of the older folks might keel over if they took a bite without knowing what it was! LOL

BUFFALO CHICKEN DIP

2 large boneless, skinless chicken breasts - chopped in chunks.
1 (8 oz) Cream cheese, softened
2/3 bottle Bleu Cheese salad dressing (not chunky)
*1 cup Frank's hot sauce (more or less depending on taste)
2 cups Monterey jack cheese, shredded


Preheat oven to 375. In medium skillet, drizzle olive oil and heat on med - high. Toss in your chicken chunks and cook about 3 - 4 minutes and then turn and cook on other side for 3 - 4 minutes. Remove from skillet. In mixing bowl, combine remaining ingredients.
Stir in cooked chicken. Place all in small casserole dish and bake at 375 for about 10 - 15 minutes, stir and return to oven to bake an additional 10 minutes. Serve with white corn tortilla chips. Time of cooking will vary according to your oven. Keep an eye on it.
*Feel free to adjust the heat of the dip by using less or more hot sauce. This amount gives it a medium heat. The cream cheese helps tone it down a bit.

Sunday, June 22, 2008

Leaving a comment

This whole blogging thing is still relatively new to me, so please be patient. I didn't realize people who don't have Blogger accounts aren't able to leave comments, because of the way I had my settings. I changed that now, so hopefully more of you will be able to leave your comments.
I'm also trying out a "chat box." You can see it off to the right. Some were saying that even with a blogger account, they were still being prevented from commenting. So we'll see how the changes work for everyone.
I'd hate to think anybody was locked out! I love to hear what you all have to say. Ideas you'd like to share, other blog links or recipes, etc...

KILLER STRAWBERRY SHORTCAKE

You read that right - it's "killer!" I LOVE the presentation of this dessert. When I first read the recipe, it said to make the cake in a clear bowl. I thought it would look better on a cake plate, but I'm so glad I didn't follow my instincts, and instead followed the recipe. It NEEDED to be in a bowl!
And if you have a pretty fruit compote bowl, it would be perfect for this. Be warned though, this is very sweet. Personally, when I make this again, I'll probably double the amount of strawberries it calls for. I would like to have tasted more of the berries. But is was still so YUMMY!

KILLER STRAWBERRY SHORTCAKE

1 large angel food cake

CUSTARD:

1 (8 oz) pkg. cream cheese, softened
1 (14 oz) can sweetened condensed milk
1 (12 oz) Cool Whip

GLAZE:

1 cup sugar
3 Tblsp cornstarch
3 Tblsp strawberry Jell-O
1 cup water
2 cups fresh strawberries, cut in half (if berries are extra large they may be cut in quarters)
Whole strawberries and mint leaves for garnish

Slice cake, using a serrated-edged knife, horizontally into 3 equal layers. Mix together cream cheese, condensed milk and cool whip in a bowl; set aside. In a medium saucepan, stir together sugar, cornstarch and jell-o; add water. Cook, stirring over medium heat until thick. Remove from heat and allow to cool completely. Then fold in sliced strawberries. Place one layer of cake in bottom of large clear bowl. Top with a layer of strawberries & glaze, followed by a layer of custard mixture. Repeat layering in this order for remaining cake, glaze and custard. For a pretty presentation, top cake with 3 whole strawberries and fresh mint leaves.

WISE KITCHEN INVESTMENTS


OK, I'll be truthful and say I wish I could invest in a full, matching set of stainless steel appliances, but ..... some preachers just aren't in it for the money! My Honey is one of them, Shucks! *hehe*
This is my island work center. And if this thing could talk...Oh the stories it could tell!
When we first moved into this house, 7 years ago, I purchased it at Kmart for $100 or something like that. I have used this work center NON stop since then. I can't stand for things to get piled on top of it. I like it clear and ready for "action!" It holds my deep fryer, my crock pot, my rotisserie oven, and my waffle iron! On this work center, I roll out cinnamon rolls, biscuits, make muffins, fix breakfast, lunch, dinner, and prepare all manner of recipes. It sits right beside my oven ready to receive a fresh batch of hot, bubbly peach cobbler or a savory roast. I use it to serve food buffet style, when we have a houseful for church fellowships, my ladies meetings or for our family reunions. The top is a butcher block, but it is getting worn from use. I don't mind though, it's well seasoned with a lot of love baked in!

SOUTHERN POT ROAST


I LOVE Sunday dinner! My family LOVES Sunday dinner. It is a BIG deal in our home. Our son and his family live next door and we all eat together every Sunday. I just LOVE it! There are usually 9 of us that eat together every Sunday, but now we've added a Summer guest, so it's 10. We always decorate the table in some fun way, seasonal or whatever strikes our fancy. And I've done that since my children were very small. My girls always got a big kick out of helping "decorate" the Sunday dinner table. We did a patriotic table for today.

This is what happens when you try to fit 18 people in my little dining room! LOL But we had a wonderful time with our guests today. You can't get to really know someone, when you only see them at church. But if you invite them over and sit down to dinner together and fellowship and laugh, THEN you really get to know them! This is how we did it. It was wall-to-wall people, but we all fit and had a fun time doing it! My Honey and I aren't in the pic. I was taking the pic and he was standing behind me making people smile! LOL That's our son & daughter in law & oldest daughter on the left. On the right are our guests, our youngest daughter and then other various and sundry friends and family members!

Anyway.... I'll usually fix roast chicken, ham, pork roast, a turkey or a nice beef roast (when I can find it on sale!). I was so thankful to the Lord when I did my shopping the other night. We had this new family from our church, over for dinner today, and I wanted to make Southern pot roast for them. When I got there, all the roasts were on clearance! WOOHOO! If you like beef that is fall apart tender, you have GOT to try this. It's DEElicious!

SOUTHERN POT ROAST

1 (3 - 4 lb) boneless chuck roast
1 tsp. Lawry's seasoning salt
Salt & pepper
2 Tblsp canola oil or olive oil
1 Tblsp beef bouillon granules
1 Cup thinly sliced onions
3 cloves garlic, crushed
2 bay leaves
1 (10 3/4 oz) cream of mushroom soup
1/2 soup can of water
1 cup beef broth
2 Tblsp Worcestershire sauce

Preheat oven to 350. Rub the roast with the Lawry's, salt and pepper. Heat the oil in a large skillet and brown the roast, searing it on both sides. Place the meat in a roaster pan. Sprinkle the bouillon granules over the meat, and cover it with onions, garlic, and bay leaves. Combine the mushroom soup, half soup can of water, beef broth and Worcestershire sauce, and pour this carefully over the roast. Cover tightly with foil and bake for 2 to 2 1/2 hours, or until fork tender. Remove and discard the bay leaves. If the gravy is not thick enough, remove the meat from the pan and pour the gravy into a saucepan. Bring it to a boil and thicken by adding a little flour mixed with cold water. I use a small Mason jelly jar for this. I fill it half way with cold water, add a couple tablespoons of flour, screw the lid on, and give it several good shakes. If there are any lumps in the thickening when I take the lid off, I fish them out with a fork. Pour slowly into the boiling gravy while stirring with a whisk.
Serve roast with mashed potatoes and gravy.

OPTIONAL: I have added mushrooms to this roast on several occasions and I don't know why I didn't today, because we all really like it that way! LOL Oh well, next time!

Friday, June 20, 2008

What's your favorite?

What is your favorite kitchen utensil? The thing you absolutely cannot do without.

Leave me a note and let me know, I'd be interested to read what you all have to say.

For me, it is a whisk that my mother in law gave me at my wedding shower (27 years ago) and yes, I still have it. I've never seen another one like it, since. I love it, it makes THEE best gravy! I like it because it gets to the edge of the pan, unlike a regular egg whisk. Works great for pudding and other fillings too.

STEAK AND ONION HOAGIE


OK those of you who lurk on the same cooking sites I do, have probably already figured out that this recipe isn't original with me. But it's a new family favorite in our home! I like to take recipes like this one and make it my own by changing a thing here & there. With this one, I added FRESH mozzarella cheese. One of the neat things about this recipe is, you can substitute chicken! we have a Summer guest, that cannot eat beef, so I prepared a small portion for her tonight, using chicken, and it is equally delicious! But be sure NOT to overcook your chicken. I used the BS chicken breast tenders. You also don't want to overcook the cube steak for this either, as that will make your meat too tough. I served this with a big ol' batch of roasted veggies! YUM!

STEAK AND ONION HOAGIE

2 - 3 lbs Cube steak, tenderized round steak
1 large onion, sliced
4 Whole wheat bolo's (smaller than a sub bun)
Butter
Lawry's seasoned salt
1/2 cup Worcestershire sauce
5 - 6 shakes Frank's hot sauce
Fresh mozzarella cheese, sliced (or provolone is good too)
*Optional: 1 can sliced mushrooms
In large skillet, over medium heat, melt 2 Tblsp butter. Add sliced onions and cook until soft and slightly carmelized. If you are adding mushrooms to the hoagies, add those to the onions now and stir until they are warmed through. Remove onion mixture from pan and set aside.
Slice cube steak against the grain, in strips as you would for stir fry. Season with Lawry's.
In same skillet you prepared the onions in, add 2 Tblsp butter and strips of beef. Cook beef in single layer in pan. Cook one side until it's brown and then flip and cook other side. About a minute or two for each side.
Add 1/2 cup Worcestershire sauce, 5 - 6 shakes of Frank's hot sauce (or tabasco), a little more butter (1 or 2 Tblsp). Add cooked onions to the skillet with the meat. Stir to combine.
Slice your bolo rolls nearly in half, but keeping them intact. Butter them liberally. Heat a griddle pan good and hot and brown the rolls until they are good and crisp, but not burned. You need them as crisp as you can get them, because if they aren't, the juice from the meat will make them a soggy mess. To assemble: lay browned roll on plate, crisp side up. Place steak and onion mixture on roll, followed by a spoonful of juice. Now lay 2 slices of fresh mozzarella cheese on top and close the bun. Cut in half and be prepared to enjoy!

Wednesday, June 18, 2008

ETOUFFEE


"First you make a roux...."

Let me first tell you, those AREN'T green peas on top of my etouffee! Gross! They are green onions! I know this dish isn't much to look at, but my oh my, is it EVER good! This is one of my Honey's all time favorites. Which, if you knew him, he's not much into "one pot wonders." LOL But this one has tons of flavor and heat, it's not a burn the first layer of skin off your tongue type of heat, but a nice flavor filled heat. I tend to be kind of a weiner when it comes to food that is too hot. I think this one has just the right combination. My Honey still insists that I bring the hot sauce to the table though, he always adds more heat to it. He's a better man than me! LOL
I like to add shrimp to this, but shrimp just wasn't in the budget this week! I don't usually buy it, unless it's buy one get one free. Tonight I made it with just the chicken (leftovers from Sunday dinner - WOOHOO!) and smoked sausage, and it was still delicious.

ETOUFFEE (E' - too - fay)

6 Tblsp butter
1/2 cup flour
2 cups chopped onion
1 cup chopped celery
1/2 cup chopped green bell pepper
2 Tblsp minced garlic
1 (14 oz) can diced tomatoes
2 bay leaves
2 tsp salt

1/2 tsp cayenne pepper
2 Tblsp Creole seasoning (recipe follows) (do not substitute any another seasoning)
1 quart chicken stock
1 pkg smoked sausage, sliced into chunks
2 cups cooked, cut up chicken
1 bag frozen shrimp (put in as many as you like)
1/4 cup chopped parsley leaves
Steamed white rice for serving
1/2 cup thinly sliced green onion tops, for garnish

First you make a roux. In a large dutch oven, melt the butter over med heat. Add the flour and stir continuously to make a roux. Stir the roux over med heat until it becomes the color of peanut butter, 5 - 7 minutes. Add the onions, celery, green bell pepper and garlic to the roux and cook stirring often, for 10 minutes. Add the tomatoes (and juice) to the pot and season with the bay leaves, salt, cayenne and the 2 Tblsp of Creole seasoning. Cook the tomatoes for 2 - 3 minutes and then stir in the chicken stock.Bring the mixture to a boil and reduce it to a simmer. Add in the cooked chicken and the sausage. Cook the etouffee stirring occasionally for 45 minutes. Add the shrimp to the pot stirring to distribute evenly. Cook the shrimp for 5 - 7 minutes or until they are cooked through. Add the chopped parsley to the pot and stir to combine.

Serve immediately over steamed white rice and garnish with sliced green onion tops.

CREOLE SEASONING

2 1/1 Tblsp paprika
2 Tblsp salt
2 Tblsp garlic powder
1 Tblsp black pepper
1 Tblsp onion powder
1 Tlbsp cayenne pepper
1 Tlbsp dried oregano
1 Tlbsp dried thyme

Combine all ingredients thoroughly and store in an airtight container.
I store mine in a ziploc baggie, and write the date that I mixed it up, on the outside of the bag. It lasts for quite a while.

BUTTERMILK BISCUITS


What is it the Southerners say? "You can't make a good biscuit without buttermilk!" Boy that is so true. I love these biscuits, they are SO much better than the store bought, refrigerated kind that you pop open. Those kind just taste like a mouth full of FOOF to me. I don't know what foof is, but I'm sure that's what it would taste like! These go good with a pan of fried chicken, a plate of biscuits and gravy, a bowl of gumbo, or baked beans, or breakfast, or just by themselves with some butter and honey drizzled on them. Or how about some homemade strawberry freezer jam? Is there ever a time to NOT have biscuits? LOL

BUTTERMILK BISCUITS

2 cups self rising flour
1/2 tsp baking powder
1 Tblsp shortening
2 Tblsp butter
1 cup buttermilk
*Melted butter to brush on tops after they bake

Preheat the oven to 450. Sift the flour and baking powder into a mixing bowl and make a well in the center. Cut in the shortening and butter until the mixture resembles coarse cornmeal. Pour the buttermilk into the dry ingredients. Mix lightly and quickly with a wooden spoon to form a dough moist enough to leave the sides of the bowl. Turn the dough onto a lightly floured surface. Knead lightly by turning the dough away from you, pressing down with palms of hands, and pushing the dough away. Repeat 4 or 5 times. Just enough to work the dough into a large, smooth ball. Roll out with rolling pin to about an inch thick. Cut out biscuits with biscuit cutter or large glass dipped in flour. Place on well greased baking sheet and bake at 450 for 12 - 15 minutes or until golden brown on top. Remove from oven and brush tops with melted butter.

Tuesday, June 17, 2008

STARR'S FAVORITE CAKE!


JELLO CAKE is one of my all time favorite cakes. This past weekend was my birthday and when my daughters asked me what kind of cake I wanted, this was my first choice. It's so simple a blockhead can make it. You just can't mess it up! And MOIST, oh my soul, is it ever moist! The nice thing is, you can dress it up with fresh berries and whipped cream and make it even better!

JELLO CAKE

1 white cake mix, prepared according to directions
1 large box strawberry jello
1 quart fresh strawberries
1 (12 oz) Cool Whip

Prepare white cake mix according to pkg instructions. Bake in a 9 x 13 pan. Remove from oven and poke holes all over the cake with a meat fork. In separate mixing bowl, prepare strawberry jello using ONLY the hot water, not the cold. Stir until jello is dissolved. Pour over the cake, making sure it gets drizzled evenly over the holes. Refrigerate until jello is set. Top with Cool whip and fresh strawberries. Garnish with fresh mint.

SAUTEED GREEN BEANS & ONIONS

This is one my favorite ways to fix green beans. Whether they are fresh or canned, this works for both. But the fresh are SO much better!

In a large skiller over med heat, add 1 Tblsp olive oil and 1 Tbsp butter. When the butter has melted, add 1/2 chopped onion, a couple good handfuls of fresh green beans (ends snipped) a good sprinkling of salt and a few sprinkles of Mrs. Dash veggie seasoning. Let them cook down for about 10 minutes, until they start to turn slightly brown here and there. Remove from the heat, throw a lid on them or a piece of foil and keep warm until ready to serve. They will finish cooking with the steam created by the lid.

BUFFALO WINGS

My family LOVES hot wings! We have them probably once a month or so. They really are very easy to make. And this recipe is a twist on the plain deep fried ones that are dipped. These get a light dusting of seasoned flour before they go into the fryer. And while we're on that note, let me recommend that you purchase a nice deep fryer with an ample size fry basket for this task. I love ours! I can fry 15 wing sections at a time in it. Takes about 12 - 15 minutes for each batch. For years I used a Fry Daddy, but could only fry about a half dozen at a time. This fryer makes it so much quicker. This is the one we purchased: It's a GE deep fryer. My Honey picked it up at Walmart for about $40.
On to the recipe!

BUFFALO WINGS

1 cup flour
1 tsp salt
1/2 tsp paprika
1/2 tsp garlic powder
1/2 tsp cayenne pepper
1/4 tsp black pepper
20 chicken wing segments
1/2 cup butter, melted
1/2 cup Frank's hot sauce

In a gallon size Ziploc baggie, place first 6 ingredients. Squeeze the top of the bag shut and give it a good shake to combine. Coat chicken pieces entirely in the flour mixture; refrigerate coated wings for 1 hour; coat chicken again with remaining flour mixture.

In a 2 quart saucepan, heat butter and hot sauce just until butter melts; turn heat to low and keep warm on stove top.

In your deep fryer, heat 1 gallon of canola oil. Deep fry 10 or so wing sections at a time for 12 - 15 minutes or until they are golden brown and floating. Drain chicken on a wire cooling rack for 30 seconds, then immediately toss fried chicken in buffalo sauce mixture and remove with slotted spoon. Repeat with remaining chicken.

The sauce for this recipe is a medium spiciness. To adjust it to mild or hot:
Mild: Use 3/4 cup butter and 1/4 cup hot sauce
Hot: Use 1/4 cup butter and 3/4 cup hot sauce.

Serve with celery sticks & either bleu cheese or ranch dressing.

PEACH CRISP w/ MAPLE BUTTER SAUCE


I don't even have words to describe how good this dessert is. I'm almost sure this dessert will be served at the Marriage Supper of the Lamb! I have made many a batch of peach cobbler and even had some fixed by other people that was really delicious. But I don't know that I'll ever want cobbler again, after having this! My family all goes into convulsions when they smell a batch of this baking in the oven! LOL I made some for them tonight - just "because."

PEACH CRISP

1 cup flour
1/2 cup sugar
1/2 cup brown sugar
1/2 tsp. cinnamon
1/2 tsp. nutmeg
1/4 tsp. salt
1 stick cold butter, cut in chunks
5 - 6 cups fresh peaches, peeled and sliced
2 Tblsp. maple syrup

Butter a 9 inch square pan and place the sliced peaches in it. Drizzle them with the 2 Tblsp. of maple syrup and give them a quick toss. In a separate mixing bowl, combine the flour, sugar, brown sugar, cinnamon, nutmeg and salt. Give it a good squish with a pastry cutter (makes the job easier, gets all the lumps out of the brown sugar). Now add in the butter chunks and continue to cut through it with your pastry cutter until all the butter is evenly dispersed. Sprinkle the crumb topping evenly over the top of the peaches. Cover with foil and bake at 350 for 15 minutes. After 15 minutes, remove the foil and bake an additional 20 - 30 minutes or until the top is a nice golden brown and a bit crisp.
While it bakes you can make the Maple butter sauce

MAPLE BUTTER SAUCE

1 1/2 cups whipping cream
5 Tblsp maple syrup
3 Tblsp light corn syrup
1/4 stick butter

Combine all ingredients in small saucepan and cook over medium heat, stirring constantly, until thickened and reduced by about 1/3. This should take about 15 minutes. If it does not thicken up for you, you can add a tiny bit of cornstarch thickening (1Tblsp cornstarch + 1 Tblsp cold water - stir into bubbling sauce).
Once it thickens, remove it from the heat. At this point you can chill it in the fridge until it's cold and thick, but we like to serve ours warm over the hot peach crisp.
Top it with a squirt of whipped cream and a sprinkle of cinnamon.
Then hit the altar Sunday and REPENT because it's downright sinful!

Monday, June 16, 2008

CALICO BEANS


A dear widow lady named Nancy Phinney, gave me this recipe back in the late 80's. She has since passed on to Heaven, and I'm so glad I asked for this recipe from her. It is hand written by her and I dated it when she gave it to me. I like to do that on my recipe cards, so I can remember who it's from and how long ago they gave it to me. This lady always brought this to church fellowships. It was her "signature" dish. Now I bring it to our church fellowships and I get asked for the recipe all the time.
If you like beans, this could be a meal in itself, with a nice hot piece of cornbread or a fresh from the oven biscuit.

CALICO BEANS

1/2 lb bacon, cut in small pieces (I use scissors)
1 lb hamburger
1 med onion, chopped
1/4 cup catsup
3/4 cup brown sugar
1 Tblsp vinegar
1 Tblsp mustard
Salt & pepper to taste
2 cans pork and beans (Bush's work the best)
1 can kidney beans - drained
1 can small lima beans - drained
*I've also added white Northern beans before too. (My Honey doesn't care for the lima beans - LOL)

Brown the bacon, onion and hamburger in a skillet and drain. In large casserole dish or small roaster add pork & beans, kidney beans, lima beans, catsup, brown sugar, vinegar, mustard, salt and pepper. Stir to combine. Then add the meat mixture and stir again. Lay 4 or 5 whole slices of
bacon over the top and bake at 350 for 1 hour.

KITCHEN MUST HAVES

You know there are just some things a cook shouldn't be without in their kitchen. This is one of them! Heavy duty, half sheet, baking pans. I have 4 of them and they get used almost every day. And since I am the Summer camp cook for our church and I also cater, these accompany me whenever I cook outside my home. I purchased mine at GFS. They have the rolled edge and are an inch deep. I use mine for:

Texas sheet cake
biscuits
cinnamon rolls
yeast rolls
cookies
large batches of brownies
any kind of dessert bars
cheesecake
various baked chicken dishes
Enchiladas
to pre-bake ribs for grilling
roasted veggies
to toast nuts or coconut in the oven

I also use them to keep pancakes and French toast warm in the oven, when I'm cooking for a crowd. I'm sure I've used it for FAR more. But the point is, this is one of my personal "Kitchen must haves."

Tuesday, June 10, 2008

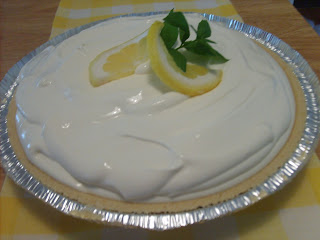
LEMONADE PIE

Somebody sent this recipe to me over my email last week. I was so excited to get it, because tonight is our ladies monthly Phebe Fellowship meeting. The theme is "When life hands you lemons, make lemonade." Of course, everything revolves around lemons and the color yellow. I knew as soon as I got this, that I'd be making it to take to the meeting. I've never had it before, but it is SO easy to make. I'm a HUGE fan of easy! As a matter of fact, I didn't make the homemade crust, I cheated and bought the shortbread crust already made. Hey! Sandra Lee says that is OK. LOL This pie is so refreshing! I LOVE it! My Honey, who isn't fond of lemon desserts just raved about it - and that was just licking the remnants out of the bowl! LOL Just wait until he finds out the 2nd one I made is an extra one for home! Next time I make this, I will freeze it for a while before I serve it too.

LEMONADE PIE


Graham Cracker Crust:

2 cups graham cracker crumbs
1/4 cup sugar
7 Tblsp melted butter
(a store bought graham cracker pie crust may be substituted)

Lemonade filling:

1 (14 oz) can sweetened condensed milk

1 (12 oz) container Cool Whip
1 (6 oz) can frozen lemonade concentrate, thawed

Preheat oven to 350.

In medium bowl, combine the cracker crumbs, sugar and melted butter. Press firmly into the bottom and up the sides of the pie plate. Bake for 7 minutes and let cool completely.

In a medium bowl, add the sweetened condensed milk and the Cool whip and fold gently. Add the thawed, frozen lemonade and continue to gently fold. Pour mixture into the pie crust and
refrigerate until ready to serve.

Monday, June 9, 2008

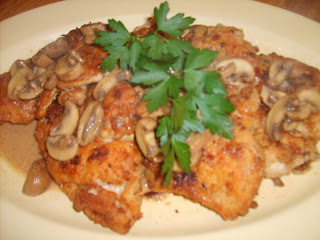
CHICKEN BREASTS IN MUSHROOM SAUCE


This dish is SO yummy! The original recipe called for Marsala or Marsala cooking wine. A good substitute for that is chicken broth. You have to try this, it is a DEElicious dish!

CHICKEN BREASTS IN MUSHROOM SAUCE

4 (About 6 oz) Skinless Boneless Chicken Breasts
1 Cup All-purpose Flour
1 Teaspoon Salt
1/4 Teaspoon Black Pepper
3 Tablespoons Butter
3 Tablespoons Olive Oil
8 oz. Cleaned, Chopped Mushroom (Baby Bella Are Nice)
1 1/2 Cup Chicken Broth
1/2 Cup Heavy Cream


Season the flour with salt and pepper. Dredge the chicken breasts in the flour and set aside.

Heat the butter and oil in a heavy skillet over moderately high heat until foam subsides. Sauté chicken, turning over once, until golden and cooked through, about 8 minutes total (4 - 5 minutes for each side). Remove from skillet and keep warm. Add the mushrooms to the pan and cook until tender and brown. Add the chicken broth to the pan and cook over high heat scraping the browned bits into the sauce. Continue to cook until the mixture has reduced by half. Stir in the cream and continue cooking until thick. Serve the chicken breasts on a warm platter, spooning the mushroom sauce over top. Garnish with flat leaf parsley.
Serve with Angel hair pasta.

Saturday, June 7, 2008

FRENCH TOAST CASSEROLE


I don't normally make anything for breakfast on Sunday morning. Sundays are so busy for us. My Honey leaves early for prayer time. And my girls and I all have Sunday school bus routes, so we are up bright and early getting ready to leave on those. We are usually up and out the door by 8:00 a.m. on Sunday morning. But I just couldn't resist this recipe. My girls were home for the weekend from college and had brought one of their room mates with them, and I whipped this up Saturday night for the next morning. Wow oh WOW is this ever good! And I love anything that you can mix up the night before! You HAVE to give this one a try! SO easy.

FRENCH TOAST CASSEROLE

12 slices Texas toast, cubed
6 - 8 egges, beaten
1 c. milk
4 apples, cored, peeled, and chopped
1/2 stick butter
1/3 c. maple syrup
2 tsp. cinnamon
1/3 c. chopped pecans
Garnish: powdered sugar; additional maple syrup

Cube bread and place in lightly greased 13 x 9 baking pan; set aside. Place eggs in a medium bowl, add milk, whisk until combined. Pour over bread cubes and set aside. In skillet, over medium heat, melt butter, add apples, pecans, syrup and cinnamon and cook until apples are slightly tender. Pour apple mixture over bread cubes. Press down lightly to make sure bread is well soaked. Bake at 375 for 30 to 35 minutes, or until set in center. Sprinkle with powdered sugar; serve with maple syrup. Makes 6 - 8 servings.

This can be mixed up the night before and refrigerated. Just bake 10 minutes longer than directed above.

STARR'S CHICKEN SALAD STARS


I can't even begin to count how many times I have made these OR passed out the recipe. People love, love, love these SO much that I always make a double batch, because I KNOW they will get eaten. It's a "given" that I make these for our ladies Christmas fellowship. This chicken salad is so versatile. I've made it into a ball and served it with club crackers, my sister-in-law has heated it, thinned it with cream and poured it over pasta and I've baked it inside crescent rolls for a heartier snack. And well..... it's just plain good to eat with a fork! If you try these, be sure to leave me a comment and let me know what you thought of them. I like to hear what you have to say!

STARR'S CHICKEN SALAD STARS

2 - 3 C. Cooked, cut up chicken
1 (8 oz) Cream cheese
4 Tblsp. Melted margarine
2 Tblsp. Chopped onion
2 - 3 Tblsp. Milk
½ tsp. Salt
1/4 tsp. Pepper
1 pkg wonton wrappers (the small ones)

Cream the cheese, melted margarine, salt, pepper, milk and onions together. Add chicken and stir to combine. Set aside. Lay 12 wonton wrappers on counter top. Brush top side of each wonton wrapper lightly w/ oil and press into lightly sprayed mini muffin tin (oil side up). Bake empty shells at 350 for 5 minutes. This is what they should look like when they are done baking.

These little shells can be used for a variety of savory or sweet fillings: Mini omelets made with scrambled eggs, ham & cheese; pizza fillings; crab rangoon filling; dessert fillings like ice cream, fruit, puddings, etc...
Anyway, back to the recipe! Remove muffin tin from oven & repeat until all shells have been baked. I have made the shells a day ahead before. I just make them all, make sure they are cool and then seal them in gallon size Ziploc bags. When you are ready to use them, place empty shells on baking sheet & fill each one w/ about 1 Tblsp of the chicken salad. (I always prepare these up to this point and set them aside until just before I need to serve them. Then pop the filled shells in the oven 5 minutes before serving time). After all the stars have been filled, place baking sheet with filled stars back in oven and bake an additional 5 minutes. Makes about 50 stars.
For a “heavier” snack: use croissant roll dough. Fill each triangle, fold over and pinch shut. Bake at 350 for 20 minutes on lightly sprayed cookie sheet.

MONSTER COOKIES


My grandson loves to help make these cookies! What kid wouldn't? There are M & M's, chocolate chips and raisins to nibble on while you're mixing them up! I remember as a little girl, my Grandpa loved to bake cookies and he always made a "giant" cookie just for me. So I continue that tradition now with my grandson. He was thrilled with his giant cookie this morning. Seriously though, these cookies are real keepers! My girls love coming home from college, to a batch of these, wrapped up and sitting in the basket, on the island in my kitchen.

MONSTER COOKIES

3 eggs
1 1/4 cups packed light brown sugar
1 cup granulated sugar
1/2 teaspoon salt
1/2 teaspoon vanilla extract
1 12-ounce jar creamy peanut butter
1 stick butter, softened
1/2 cup M & M's
1/2 cup chocolate chips
1/4 cup raisins
2 teaspoons baking soda
4 1/2 cups quick-cooking oatmeal (not instant)

Preheat the oven to 350 degrees F. Line cookie sheets with parchment paper or nonstick baking mats.

In a very large mixing bowl, combine the eggs and sugars. Mix well. Add the salt, vanilla, peanut butter, and butter. Mix well. Stir in the chocolate candies, chocolate chips, raisins, if using, baking soda, and oatmeal. Drop by tablespoons 2 inches apart onto the prepared cookie sheets.

Bake for 8 to 10 minutes. Do not overbake. Let stand for about 3 minutes before transferring to wire racks to cool. When cool, wrap each cookie individually in saran wrap.

Thursday, June 5, 2008

PESTO CHEESE BLOSSOM

At first glance this may seem like a difficult recipe, fussy even, but trust me, it's not! It's so simple. I don't know about you, but I get tired of the same ol' cheese ball recipe. You see it all the time at church fellowships. It's good, but it gets kind of boring after a while. This one is REALLY delicious. I served it at my daughter-in-law's baby shower, and all the ladies just raved about how pretty, and how tasty it was. Sorry for the poor photography. That's not my forte' - LOL I suppose I should have picked a less "busy" plate for the photo. But I'm sure you get the idea. Serve this up at your next family gathering, reunion, church fellowship, ladies meeting, and you'll get all kinds of ooh's and aah's!


1 (8 oz) package sliced provolone cheese
2 (8 oz) packages cream cheese, at room temperature
20 pistachios, shelled
2 cloves garlic
1/2 cup fresh basil leaves
1/2 cup fresh parsley leaves
1/2 cup pine nuts
1/4 teaspoon salt
1/4 teaspoon freshly ground pepper
2 tablespoon extra-virgin olive oil
3 ounce oil-packed sun-dried tomatoes


Directions:

Line a medium bowl with plastic wrap, leaving enough overhang to cover the top. Reserving 3 slices of the provolone, line the bottom and sides of the bowl with the remaining provolone, overlapping the slices. For the cream cheese layer, process the cream cheese, pistachios, and 1 of the garlic cloves in a food processor until blended; scrape the mixture into a bowl and set aside. For the pesto layer, process the basil, parsley, pine nuts, and the remaining garlic clove in the food processor until blended. Dissolve the salt and pepper in the olive oil and mix well. With the machine running, add the oil in a fine stream. Scrape this mixture into a second bowl and set aside. For the tomato layer, drain the tomatoes, reserving the oil. Puree the tomatoes with a small amount of the reserved oil in a food processor. Spread some of the cream cheese mixture over the cheese slices lining the bowl. Layer the pesto mixture, half of the remaining cream cheese mixture, the sun dried tomato mixture, and then remaining cream cheese mixture in the bowl. Cover with the remaining provolone cheese. Bring the edges of the plastic wrap together over the top and secure with a twist tie. Freeze until firm. Remove the plastic wrap and invert the mold onto a serving platter. Serve with party crackers. This will keep in the refrigerator for up to 3 months.

Wednesday, June 4, 2008

INSIDE OUT BURGER


This is a HEARTY burger. We had these for dinner one night last week and all that was needed to complete the "meal" was a light green salad. The flavor combination is out of this world. So much nicer than a plain, ol' boring hamburger. The only difference was, I didn't fry ours on the stove. My Honey grilled them outside on our gas grill. We love the taste of grilled food and use ours year round, even here in MI.

1/4 pound bacon, chopped
1/2 cup minced red onions
Salt and freshly ground black pepper
2 pounds ground chuck, 80/20 mix
1/2 pound Cheddar thinly sliced, about 8 slices
4 kaiser rolls, split and toasted (I buttered and grilled ours)
In a medium pan over medium to high heat, add bacon and onions, cook until the bacon is rendered but not crisp. Remove the bacon mixture to a paper towel-lined plate to drain and cool.

Divide ground chuck into 8 equal parts. Form into a loose ball, and create 4-inch patties. Layer 1 piece of cheese onto the center of 1 patty. Top with 1/4 bacon mixture, another slice of cheese, then add another patty on top and gently seal edges and form into a patty, about 4 inches wide and 1 1/2 inches high. Repeat with the remaining patties to make a total of 4 large patties.

Heat a medium saute pan over medium heat. Place all 4 patties in the pan and cook for 3 to 4 minutes on 1 side, then gently turn over and cook for another 3 to 4 minutes. Remove the pan from the heat, cover and pop it in a 250 degree F oven for 10 minutes.

Optional: These can also be grilled on your gas or charcoal grill.


GRILLED PEANUT BUTTER AND JELLY


We've all heard of Elvis' Peanut Butter, Jelly and Banana sandwich, and that one's a real favorite of mine, especially when it's on toast. I also like peanut butter toast with honey and banana slices on it! Mmm! My Honey loves peanut butter, jelly and Miracle whip sandwiches! Blech! My brother-in-law used to eat peanut butter and ONION sandwiches! Double Blech!The variations of Peanut butter and .... sandwiches are endless. And I confess this one isn't rocket science. But more times than not when I mention this sandwich to people, they look at me like I'm crazy. It's so simple, but so yummy. We went to visit my sister in law and her family in Brazil a few years ago and we told them about it, and it became one of their favorites as well. It makes a quick Sunday night snack. When you want something other than popcorn! LOL Make sure you have a tall, cold glass of milk standing by!

What's YOUR favorite peanut butter sandwich combo? I'd love to hear them all. Send me a comment telling me your favorite.

GRILLED PEANUT BUTTER AND JELLY

2 slices of bread - I like Cracked wheat
JIF Peanut butter
Welch's grape jelly
Softened butter

Slather one slice of the bread with JIF peanut butter and the other with grape jelly. Put the two slices together to make your PB & J sandwich. Heat a griddle to med - high on the stove. Butter one side of your sandwich liberally and place it butter side down on the griddle. Now butter the other side that is facing up. Cook it just like you would a grilled cheese - until it is a nice golden brown. Enjoy with a cold glass of milk.

LOADED BAKED POTATO SOUP


I grew up eating potato soup made with a base of water and milk. That was the way my Mom cooked it, and I liked it because it's all I knew. She used other things like butter and onions too, but the base was always sort of bland and you needed to add salt to jazz it up. But soup made with a base of any kind of broth, chicken, beef or vegetable, has a much richer flavor. And it's so easy today to have a nice broth to use, since most grocery stores carry them in the soup aisle.
It was chilly, rainy and just plain gray outside yesterday, so this is what I made for dinner. I had my 2 grandbabies overnight, and when you can get a 2 yr old to eat soup and say "YUMMY" to boot... well, I figure that's a home run in my book!


Loaded Baked Potato Soup

Prep. Time : 0:35
Serves : 2-4

1 quart chicken broth
6 med. potatoes - peeled, cubed
2 green onions - trimmed, sliced
2 tsp. distilled white vinegar
1 tsp. salt
½ stick Butter
1 cup 1/2 & 1/2 mixed with 2 Tbls. all-purpose flour
1/4 cup shredded cheddar cheese
1/4 cup shredded Monterey jack cheese
2-6 strips cooked bacon - crumbled
Chives for garnish
Sour cream for garnish


-Bring first 6 ingredients to boil in a saucepan over medium-high heat.
-Cover and simmer over medium-low heat for 20 minutes, stirring occasionally.
-Whisk milk/flour mixture into saucepan; stir in cheese and bacon.
-Simmer, uncovered, 5-8 minutes, or until thick, stirring constantly.
- Transfer to bowl and garnish with chives and sour cream


Monday, June 2, 2008

Thanks for stopping by!

This blog is in the beginning stages, but I am very excited about it! I LOVE to cook and am not afraid to try anything. I hope to begin posting pictures with my recipes and am in the process of formulating those. Please be patient...